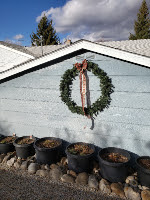
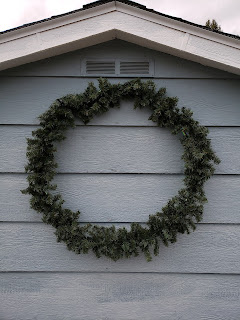
How to Make a Hula Hoop Outdoor Wreath in less than an hour and decorate your outdoor area! This wreath is easy to make, a fun group project, and can be made with thrifted/repurposed materials. From the DIY Homemade Household side of the blog!
I am a thrifter and repurpose-er from way back!
Many years ago my dad would bring home working yet castoff refrigerators from work (he was a repairman), clean them up, and turn them into freezers. Anyone family in the neighborhood needing a freezer would get one. That act of kindness was just one of the ways I learned to make due, make it better or when needed, do without.
Fast forward to today and our small town has a couple of local charity thrift stores that I go to semi-regularly. It is fun to search for the unusual, plus I like helping our local charities. And let's be honest, finding a good deal is always good for the pocketbook.
Thrifting often means buying items "out of season".
Last summer when I was out thrifting I found two brand new Christmas Garlands. Now don't think for a minute that because it was Summer I left them at the store...no way, into my cart they went! Garlands can be quite handy, and these, in particular, were a good price. At the very least, I knew we would have some garland to play with when Christmas decorating rolled around!
Another handy tip for garland is to fill in an older artificial Christmas tree beginning to look a bit worn with thinned-out areas on the branches. Attaching a garland around the center pole will fill it in. This little trick is much cheaper than purchasing a new tree every four to five years. Our trees still look pretty good, which meant I needed to hang garland or come up with a project...
This is our first year decorating the courtyard outside our apartment.
You may recall we had a serious snowmelt runoff problem that we solved this past summer with the addition of a 5-yard load of dirt, a retaining wall, and five rhubarb plants! Snow in our area falls, then melts, and soon more snow will fall. We were living in a constant state of either a mud puddle or miniature ice rink. Neither was ideal, and a solution was needed. Personally I really like how it all came together!
But, decorating was not a priority. Plus I had taken a serious fall the winter before and was left with a broken wrist, it goes without saying, no decorations that year either! But now our courtyard has a lovely lighted pathway and plenty of space to add decorations!
That wreath is much bigger than it looks in the photo!
And then it hit me, why not make a large wreath to hang up outside? I already had two garlands, the only other consideration was what was I going to attach the garland material to? Why not a hula hoop? They are inexpensive, lightweight yet strong enough to hold the garland material and a large bow.
Now to be honest I wasn't certain I would find a hula hoop this far out of season, but I thought I should give it a try. Plus we already had our monthly out-of-town shopping trip planned, if I was going to find a hula hoop, it would be during this shopping trip out and about.
When I walked into the toy department, I looked around, and right there in front of me was the last of the summer toy stock, including a handful of hoops. There was a couple of different types. One had lights that were motion-activated. And the others were shocking pink and other assorted neon colors. Then I spotted the green one. I felt quite fortunate that I found a green hula hoop, but if needed I could have purchased a roll of green duct tape and carried on...
I was making this whole project up as I went along. But one thing was certain, I did not want to have to run back to a store an hour away. Once home again I started attaching the garland to the hoop. And while my first attempt looked nice, it seemed, in my opinion, to be unstable for our area. We tend to get quite a lot of wind. There was only one thing to do, take it apart and start again, so I did. And I am happy to report that the second time I put it together was exactly what I needed to do! So here goes...
Let's make a Hula Hoop Outdoor Wreath, shall we?
Material needed/used for this project:
- 2 9 foot evergreen garlands, new or used
- 1 hula hoop, again new or used, green is best
- 1 package of garland twist ties
- 1 package of cut floral wire or pieces of wire cut from a spool
- 1 large bow
Take the garlands from the packaging band, unwind them, and lay them flat. Off-set the ends by about 12 inches. Using the floral wire, attach the two garlands together about every eight inches, twisting the floral wire around the two garland spines. Secure them together tightly.
Once the garlands are wired together, it is time to twist tie them to the hula hoop.
Lay the hula hoop on a flat surface, coil the garland around the hoop.
Twist the wire from the end of the garland securely around the hula hoop. From there using a garland twist tie, secure the garland to the hula hoop making sure that it is pulled tightly, secure every 8 to 10 inches.
When you come to the next wire end of the garland (remember the garlands have been offset by about 12 inches, the end wire will be that far away from the first wire) twist that wire around the hula hoop as well. Continue attaching the garland around the hula hoop using the garland ties until you come full circle, and finish by twisting the other wire end of each garland around the hula hoop securely.
I had a couple garland ties left over and used them where it seemed the garland was sagging a bit or I was a bit longer in the 8 to 10 inches. I knew more garland twist ties would not be a problem. Once I was out of supplies, I stood the hula hoop up. Everything seemed quite secure, which was good. The last thing I want is for this to come apart in the wind. Then it was time to take it outside and get it positioned in place.
Next, we need a bow. Now I must confess, I have a unique skill for bow making. I don't actually make a bow, I do however make what I like to call a pile of wrinkled ribbons. So I made a deal with my daughter who makes beautiful bows to make one for me...
Here is a breakdown of the costs.
5.98 for the hula hoop
1.98 for two garlands
2.98 for the garland twist ties
.99 for the floral wire
2.99 for the bow ribbon
For a total of only $14.92!
Of course, any repurposed materials would reduce the overall costs of this project.
This Hula Hoop Outdoor Wreath was fun to make and it turned out to be one of those crafts that came together in spite of my not measuring anything, and not really knowing what I was doing! But to me, that is part of the fun, use what you have, and make it better.
After the
Hula Hoop Outdoor Wreath was hung, I put a red bow on one of the
Barbed Wire Wreaths made earlier this year...this one hangs on our handy little wood hut by the back door!
Thanks
for stopping by!
We
offer new and delicious recipes as well as DIY ideas for your home, regularly.
Feel free to drop us an email request for any question or recipe you may be
looking for. In addition, like all our guests, we invite you to come for a visit
again and again for new recipes, and my down-home take on frugal ways to keep
your home in tip top shape.
Hey
you, don’t miss a post! Please consider following Scratch Made Food! & DIY
Homemade Household. To follow by email, and/or by RSS feed, complete the
application located on the right-hand side of the blog. Please Note,
some posts may contain affiliate links, thank you for supporting Scratch
Made Food! & DIY Homemade Household.
PS,
friends, and family who love good food and household ideas might love us too!
Tell them about us, and thanks for the referral!
You may also enjoy, Creative writing from the heart... stories of life,
living, and family.
Scratch
Made Food! & DIY Homemade Household proudly shares with these generous link
parties featured here.


Your wreath is beautiful!
ReplyDeleteThank you very much!
DeleteGreat idea! Thanks so much for linking up at the Unlimited Link Party 63. Pinned and/or shared!
ReplyDeleteDee, thank you for hosting! Have a great week ahead.
DeleteVisiting again to say thanks so much for linking up at #IMadeItMondayLinkParty 1. Shared.
ReplyDeleteDee, you are welcome!
Delete